最近(2009年頃)の ThinkPad などでは、指紋認証デバイスがくっついていて、 Windows へのログイン時の認証が楽にできるようになっています。 *BSD でも、fprint を使用することで、指紋認証デバイスを利用できるようになります。 FreeBSD と NetBSD での fprint の設定方法を解説します。
fprint のインストール
↓
指紋登録
↓
PAM の設定
# cd /usr/ports/security/pam_fprint
# make install
(中略)
=========================================================================
In order to enroll new finger prints, you must have r/w access to the
usb device node(s) of your finger print reader (i.e., /dev/{ugen, usb*})
(tested with UPEK finger print reader as found in Lenovo T61).
It is recommended to use devfs.rules(5) and a dedicated group to manage
access to your finger print reader.
You can use `usbdevs -v' to see if your sensor is accessible.
Example configuration:
- /etc/rc.conf:
devfs_system_ruleset="localrules"
- /etc/devfs.rules:
[localrules=10]
add path 'ugen0*' mode 0660 group operator
add path 'usb0*' mode 0660 group operator
# /etc/rc.d/devfs restart
Read `pam_fprint_enroll --help' to learn about enrolling fingers.
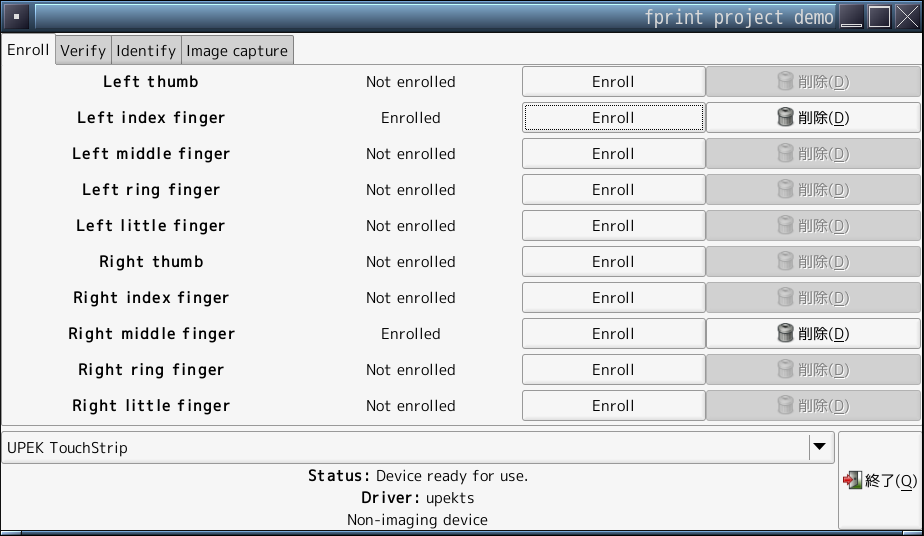
The security/fprint_demo port contains the graphical `fprint_demo'
application that allows you to manage your finger prints in a comfortable
way.
After enrolling fingerprints for your user(s), you can enable finger
print authentication by adding the following line to the corresponding
PAM configuration file(s) (see the PAM documentation and the pam_fprint
web site for more information).
auth sufficient /usr/local/lib/pam_fprint.so
/etc/pam.d/system is used for system-wide defaults,
/etc/pam.d/{gdm, kde} are used by the GDM/KDM login managers.
=========================================================================
# make clean
指紋登録をやりやすくするために、GUIの管理ツールもインストールします。
# cd /usr/ports/security/fprint_demo
# make install
# make clean
デフォルトでは、一般ユーザーは ugen* デバイスの読み書きをすることができません。 そのため、devfs を使って一般ユーザーに ugen* デバイスの読み書き権限を与えないと、指紋の登録作業ができません。
まず、/etc/devfs.conf に以下の設定を追加します。
# 一般ユーザーが operator グループに属している場合の設定
[localrules=10]
add path 'ugen*' mode 0660 group operator
add path 'usb*' mode 0660 group operator
次に、 /etc/rc.conf に以下の設定を加えます。
devfs_system_ruleset="localrules"devfs の設定を読み込み直して、指紋登録ができるようにします。
# /etc/rc.d/devfs restart
# cd /usr/pkgsrc/security/pam-fprint
# make install

(中略)

===========================================================================
$NetBSD: MESSAGE,v 1.1.1.1 2009/02/26 21:52:00 plunky Exp $

Read `pam_fprint_enroll --help' to learn about enrolling fingers. The
fingerprint data is stored in the users home directory under the .fprint
directory, and the program must have read/write access to the USB devices.

After enrolling fingerprints for your user(s), you can enable finger
print authentication by adding the following line to the corresponding
PAM configuration file(s) in /etc/pam.d

auth            sufficient      /usr/pkg/lib/security/pam_fprint.so

Note that using a fingerprint to authenticate is not particularly
secure, see the pam_fprint web site for more information.
===========================================================================
# make clean-depends clean
指紋登録をやりやすくするために、GUIの管理ツールもインストールします。
# cd /usr/pkgsrc/security/fprint-demo
# make install
# make clean-depends clean
(一般ユーザーが wheel グループに属している場合)
% sudo chmod g+rw /dev/usb? /dev/ugen*
指紋認証デバイスは以下のように認識されているはずです。
% dmesg | grep ugen
ugen0 at uhub0 port 2
ugen0: STMicroelectronics Biometric Coprocessor, rev 1.00/0.01, addr 3
もし、 指紋認証デバイスが /dev/ugen1 として認識される場合には、下記のように ugen1 のデバイスファイルを作成しておかないと、指紋認証ができなくなります。
% su
# cd /dev
# ./MAKEDEV ugen1
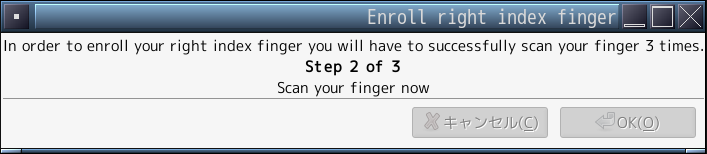
% pam_fprint_enroll --help
Usage: pam_fprint_enroll options
	-h	--help			Display this usage information.
	-f	--enroll-finger index	Enroll finger with index.

	Valid indexes are:
	1 - Left Thumb
	2 - Left Index Finger
	3 - Left Middle Finger
	4 - Left Ring Finger
	5 - Left Little Finger
	6 - Right Thumb
	7 - Right Index Finger
	8 - Right Middle Finger
	9 - Right Ring Finger
	10 - Right Little Finger
% pam_fprint_enroll -f 7
This program will enroll your finger, unconditionally overwriting
any selected print that was enrolled previously. If you want to
continue, press enter, otherwise hit Ctrl+C
(Enter を入力)

Found device claimed by UPEK TouchStrip driver
Opened device. It's now time to enroll your finger.

You will need to successfully scan your Right Index Finger 3 times
to complete the process.

Scan your finger now.
(指を読み取らせるけど、うまくいかない)
% fprint_demo
login: yamajun
Scan right index finger on UPEK TouchStrip
auth sufficient /usr/local/lib/pam_fprint.so
# auth
# ↓ここに挿入
auth            sufficient      /usr/pkg/lib/security/pam_fprint.so
auth            sufficient      pam_self.so             no_warn
auth            required        pam_nologin.so          no_warn
auth            include         system